Introduction
In this post, we'll go over step-by-step instructions for installing Microsoft SQL Server on Windows computers. We'll use Windows Server 2019 and SQL Server 2019 Developer edition for this tutorial.
Pre-requisites
Using a Windows computer with a 2 core and 4 GB of RAM
Download the 2019 Developer Edition of SQL Server.
Download the SQL Server installation files from the official website
first.
Let start with how to install SQL Server.
1. Download Microsoft SQL Server from the below url.
https://www.microsoft.com/en-au/sql-server/sql-server-downloads
2. After download click sqlexpress.exe.
Click on the Installation page and then on ‘New SQL Server stand-alone installation or add features to an existing installation’
Select Evaluation and click the Next Button.
Note
Standard Instance
A client does not need to give the name of the instance when connecting to SQL Server when it is installed in the default instance. Only the server name needs to be known by the client. HARDIK-PC, as an illustration.
Known instance
The network name of the computer and the instance you choose during
installation together identify a named instance. When connecting, the client
must include both the server name and the instance name. HARDIK-PC/MSSQLSERVER,
as an illustration.
"SQL Server's correlations include sorting criteria, case and accent
sensitivity, and other properties for your data. The code page and related
characters that can be represented for character data types like char and
varchar are determined by collations used with those data types. – Microsoft”
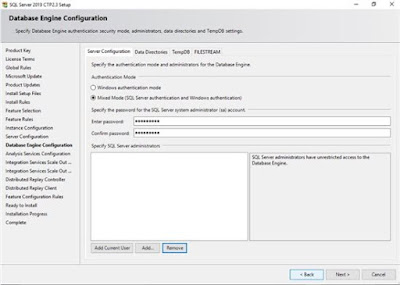
Specify Authentication modes (Windows or Mixed mode) and add users to have SQL Server administrators.
The Database Engine
Configuration window will appear after that. Select Mixed Mode under
Authentication Mode in the Server Configuration tab, and then enter a strong
password. Your current Windows user should already be automatically inserted in
the "Specify SQL Server administrators" section. Alternatively,
select the Add Current User option.
Click on Data Directories and we can specify the data, log files, backup directories here.
Place database files and backup files in the locations you choose in the Data Directories tab. By default, it saves all of the files to the C drive, however it is not advisable to store database files on an OS drive because we risk losing our data if an OS-related problem arises. I therefore select my local machine's D drive.
Click on TempDB to configure the TempDB configurations. We will move with the default configuration suggested by the installer.
There are
configurations for the temporary database file in the TempDB tab (s). There are
certain recommended configuration settings for the locations, number, and size
of temporary database files. The number of logical processors should ideally
match the number of TempDB data files. I therefore have a lot of files to 2.
Here is a fantastic post on TempDB best practises if you're interested in
learning more.
We won't be using
this feature, therefore keep the checkbox unchecked under the FILESTREAM tab.
These huge files, photos, or documents can be stored directly on the file
system using SQL Server's FILESTREAM feature. For additional details, click on
Next button.
We get an overview of the SQL Server configurations from the Ready to install page. Review the information and click on next to start the installation process.
Once the installation is completed, launch SSMS 18.0 preview to connect with SQL Server.
Congratulations!
We have successfully installed SQL Server 2019 Developer edition on Windows
machine. Next, you can install SQL Server Management Studio to connect SQL
Server and query SQL databases. Please follow below steps to install SQL Server
Management Studio.


